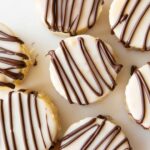
Zebra Cakes
I am OBSESSED with these copycat Zebra Cakes that look and taste even better than the Little Debbies version. I grew up loving Zebra Cakes, so I knew I had to put my own better-for-you spin on them. These are free from preservatives and made with simple ingredients like almond flour and cottage cheese for a healthier, protein-forward twist. These cakes are soft, fluffy and filled with a light buttercream and a white chocolate coating that's SO good, and after lots of testing they're honestly perfect. Top them off with the signature "zebra" drizzle and you'll never go back to the boxed version again!
Servings 12 -14 Zebra Cakes
Calories 357kcal
Equipment
- 9x13" Baking Pan
- (2 or 2 1/2-inch) Cookie Cutter
Ingredients
Yellow Cake
- 2 cups all-purpose flour spooned and leveled
- 1 1/2 cups almond flour spooned and leveled
- 1 cup granulated sugar
- 1 Tablespoon baking powder
- 1/2 teaspoon salt
- 1/2 cup olive oil
- 2/3 cup 2% milk
- 3/4 cup 4% cottage cheese
- 4 large eggs
- 1 Tablespoon vanilla extract
Buttercream Filling
- 1/2 cup unsalted butter softened at room temperature
- 3 cups powdered sugar
- 3 Tablespoons milk
- 1 teaspoons vanilla extract
White Chocolate Coating
- 1 12-ounce bag white chocolate chips
- 3 Tablespoons boiling hot water or coconut oil, see notes
- 1/2 cup semi-sweet chocolate chips or chopped chocolate
Instructions
Make the Cake
- Preheat the oven to 350 degrees F. Line a 9x13” baking pan with parchment paper.
- In a large bowl, whisk together the all purpose flour, almond flour, sugar, baking powder and salt.
- In a blender, combine the oil, milk, cottage cheese, eggs and vanilla extract. Blend for 30-60 seconds, until combined and smooth.
- Pour the blended liquid mixture over the dry ingredients and whisk all together until a thick batter forms. Be sure not to overmix!
- Pour the batter into the pan and bake for 30-33 minutes or until a toothpick inserted into the center comes out clean.
- Remove from the oven and let cool on a wire rack for at least 1 hour before filling.
- Once fully cooled, set the cake in the freezer for 30 minutes so it becomes easy to slice. Alternatively, cover the cake and set it aside to assemble the zebra cakes the next day.
Prep & Add Buttercream
- While the cake cools/chills, prepare the buttercream filling.
- Add the softened butter to a bowl of a stand mixer and beat on low speed for 2 minutes.
- Slowly add in the powdered sugar and beat for 2 minutes; until mixture looks very dry.
- Add the milk and vanilla and beat 5 more minutes on medium speed. Pause and scrape down the sides of the bowl as needed.
- Remove cake from the freezer and transfer the cake onto a large cutting board.
- Use a serrated knife to level the top of the cake, saving the cake scraps.
- Use a 2 or 2 1/2-inch cookie cutter to cut 12-14 circles of cake. Save the cake scraps (notes on this at the bottom)!
- Slice each cake circle in half lengthwise.
- Spread a generous layer of frosting onto one half of the cake, then grab your second half of the cake and put them together. Repeat with the remaining cake cutouts. You will end up with 12-14 mini cakes.
- Use a knife or your finger to smooth any icing that is peeking out the sides of each mini layered cake.
- Place mini layered cakes onto a baking sheet and place in the freezer for 20-30 minutes.
Coat with Chocolate Topping
- Bring some water to a boil and pour 3 Tablespoons of it over the white chocolate chips, stirring quickly without splashing it around. The more you whisk, the smoother things will get! If you notice the white chocolate chips not combining well, microwave the chocolate for 30 seconds and then stir again. Repeat until completely smooth!
- Set the cakes on a cooling rack over a piece of parchment paper (for easy cleanup). Spoon the white chocolate over the tops of each cake and spread around the edges. Repeat with remaining cakes.
- Melt the semi sweet chocolate in a microwave safe bowl for 20 second intervals, stirring in between, until fully melted.
- Transfer semi sweet chocolate to a ziplock bag, snip off the end and use it to quickly drizzle the cakes to make the zebra design.
- Let the cakes sit in the fridge for 30 minutes to set the chocolate before serving. Enjoy!
Video
Notes
Use White Chocolate Instead of Water In The Coating
Making the white chocolate with hot boiling water is my favorite way for easy coating of these cakes! However, after a day in the fridge, it doesn’t hold up as well. If you want to store these for later, try melting 2 Tablespoons of coconut oil with the white chocolate chips, stirring often until smooth. Then smooth the melted white chocolate over each of the cakes and set them in the fridge! (If, after 2 Tablespoons of coconut oil, the white chocolate feels too thick, feel free to add 1 more Tablespoon of coconut oil and mix it into the already melted chocolate.)
Using Up the Leftover Cake Scraps & Buttercream
There will be a decent amount of cake scraps and buttercream leftover. Then best use for this in my opinion, is to make zebra cake pops! Just crumble up the cake scraps, mix them well with the leftover buttercream, and then roll them into balls. Set them on a baking sheet with parchment paper, put a treat stick through each one, and freeze for 15-20 minutes. Melt 1 cup of white chocolate chips with 1 Tablespoon of coconut oil, mix until smooth, and then coat each cake pop. Drizzle with chocolate for the “zebra” stripes and freeze for another 15-20 minutes. Enjoy!
Nutrition
Serving: 1Zebra Cake | Calories: 357kcal | Carbohydrates: 51g | Protein: 7g | Fat: 19g | Saturated Fat: 6g | Polyunsaturated Fat: 1g | Monounsaturated Fat: 7g | Trans Fat: 0.2g | Cholesterol: 61mg | Sodium: 48mg | Potassium: 90mg | Fiber: 2g | Sugar: 36g | Vitamin A: 226IU | Calcium: 43mg | Iron: 2mg