
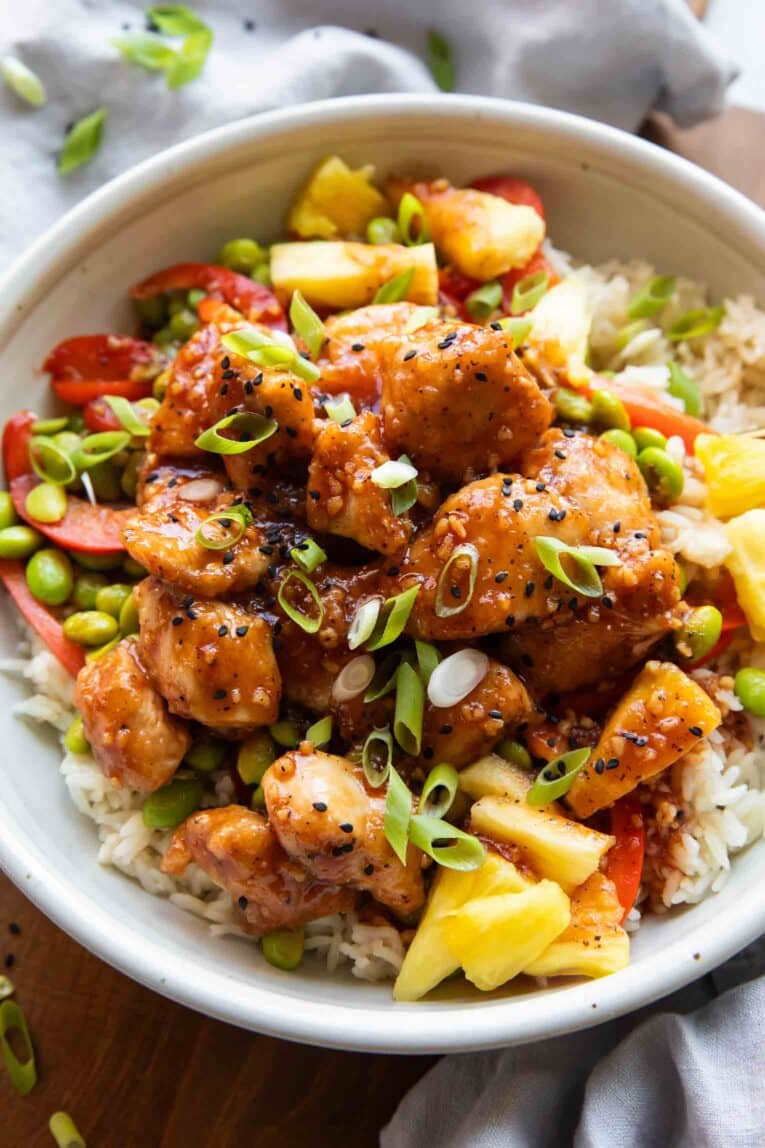
30-Minute Sweet & Sour Chicken Bowls
If you love Chinese takeout but want something a little healthier, this Sweet and Sour Chicken Recipe is a MUST! There’s nothing I love more than taking my favorite restaurant meals and recreating a healthy version of them at home, so I knew I had to put my own twist on this classic recipe. And after lots of testing, I can honestly say I’m so obsessed!
Inspired by the flavors in my Sweet and Sour Meatballs Recipe and the method for my Honey Sesame Chicken Meal Prep Bowls, these bowls are made with pantry staples and are completely refined sugar-free. Plus, prep time is quick, and everything cooks in one skillet, meaning I can get in and out of the kitchen in about 30 minutes. Way faster than ordering takeout! It’s a big deal if my kids like a chicken recipe that has sauce on it, so you KNOW it’s a good one. And once you taste it, you’ll completely understand!
Need help with meal planning and getting healthy meals on the table quickly? Join my FREE 7-Day Meal Planning Secrets course to learn how to confidently put a weekly meal plan together in 10 minutes or less!
Why You’ll Love This Recipe
- Better-for-You – Pan-fried instead of deep-fried, these bowls use way less oil than most sweet and sour recipes and are free from MSG or other additives.
- Healthy + High-Protein – With 47 grams of protein, 6 grams of fiber, vitamins, and nutrients from the veggies, these bowls make for a filling, well-rounded meal that still tastes indulgent.
- Customizable – Dairy and gluten-free, these bowls are easy to customize to suit your flavor preferences. Up the heat if you love spice, add more sweetness for picky eaters, or mix and match different veggies and toppings. The options are endless!
- Meal Prep – Leftovers store and reheat well, meaning I can cook once and have ready-to-eat meals that I can quickly reheat for several days. It’s a lifesaver on busy weeks!
RELATED: Bang Bang Chicken Bowls
Ingredients
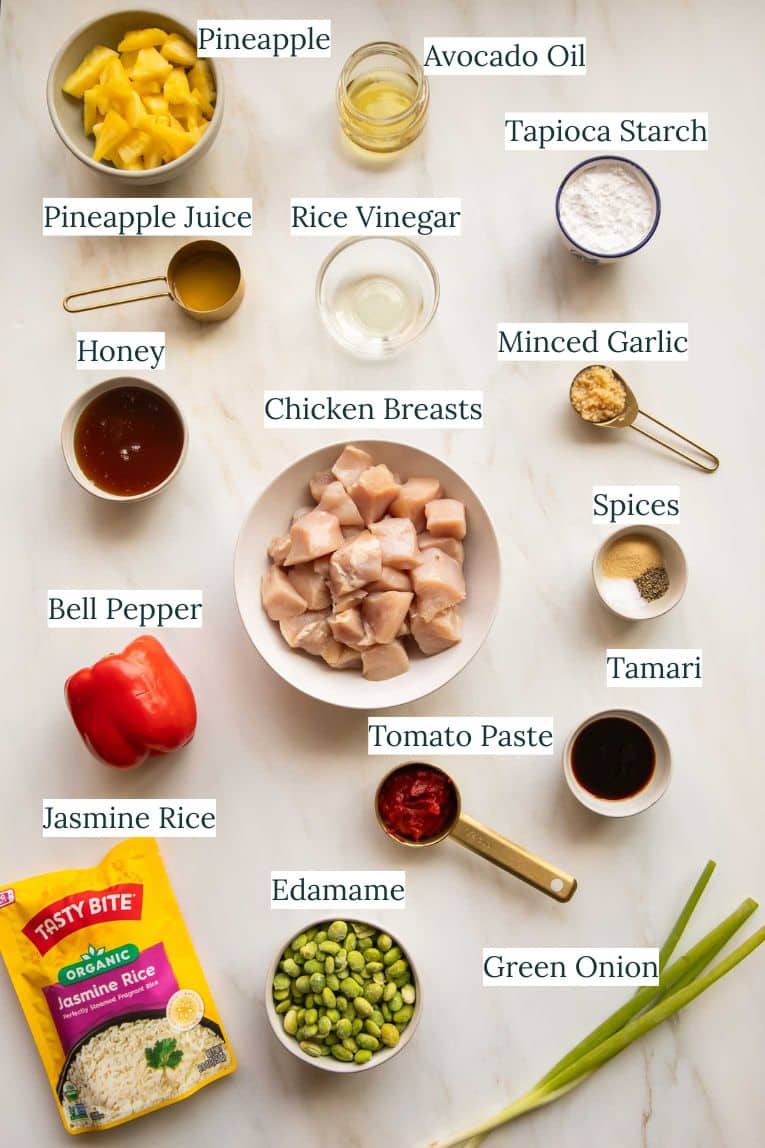
Chicken
- Tapioca Starch – This is key for a crispy exterior! Feel free to use potato starch as a substitute.
- Seasonings – Garlic powder, salt, and pepper
- Chicken – I use boneless, skinless chicken breasts to keep the bowls fairly lean. I also find their mild flavor pairs well with the sauce, but you can substitute boneless, skinless chicken thighs if preferred.
- Avocado Oil – Olive oil is a great alternative as well, but it will create a slightly different flavor.
Sauce
- Pineapple Juice – I use canned or bottled pineapple juice to keep the recipe easy, but feel free to make your own.
- Rice Vinegar – This is sweet and slightly tangy. I find mine in the international aisle of my local grocery store!
- Honey – This creates the “sweet” component. Maple syrup or a small amount of brown sugar or coconut sugar can be used as a substitute.
- Tomato Paste – This creates an acidic base, adding depth to the sauce.
- Tamari – This adds a savory, umami taste and a touch of saltiness that balances out the sweetness of the sauce. You can also use regular soy sauce or coconut aminos instead!
- Garlic – I typically use pre-minced garlic to save time. It’s one of my favorite kitchen hacks!
- Salt/Pepper
Veggies
- Avocado Oil – Again, olive oil will also work, but the flavor will be slightly different.
- Edamame – I like to use frozen shelled edamame and just thaw and drain it before cooking.
- Bell Peppers – Any color works!
- Pineapple – Canned or fresh both taste great.
- Salt
Bowls
- Rice – I use Jasmine rice, but brown rice or even cauliflower rice all work well. Use microwave rice pouches to save time!
- Green Onion (Scallion) – Use both the white and green parts.
How to Make Sweet and Sour Chicken Bowls
You won’t believe it’s possible to make something so tasty in about 30 minutes! All you need are two medium bowls and a large non-stick skillet. Here’s how to make homemade Sweet and Sour Chicken Bowls:
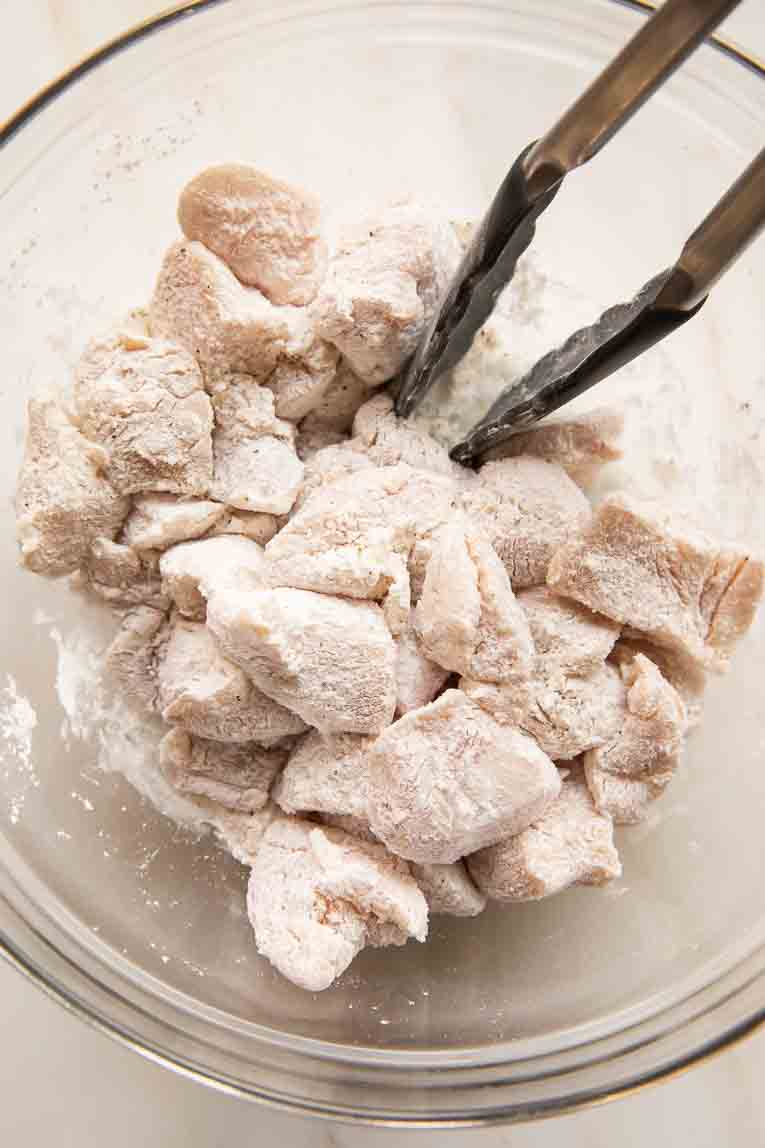
- Bread the chicken – Combine the tapioca starch and seasonings in a medium bowl, add the chicken, and toss to coat each piece.
- Cook – Heat oil in a skillet over medium-high heat, and fry the chicken pieces until they’re golden brown on all sides and fully cooked.
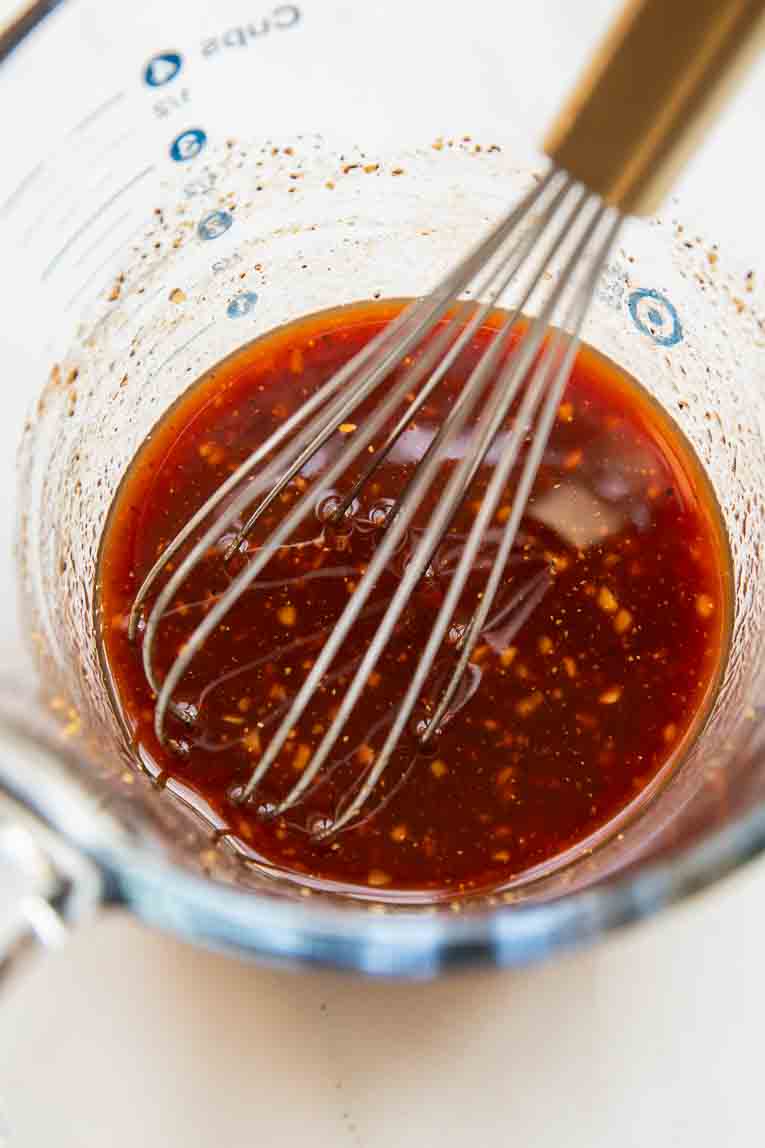
- Prepare the sauce – While the chicken cooks, mix all the sauce ingredients in a bowl.
- Drain the chicken – Transfer the chicken pieces to a paper towel to absorb excess oil.
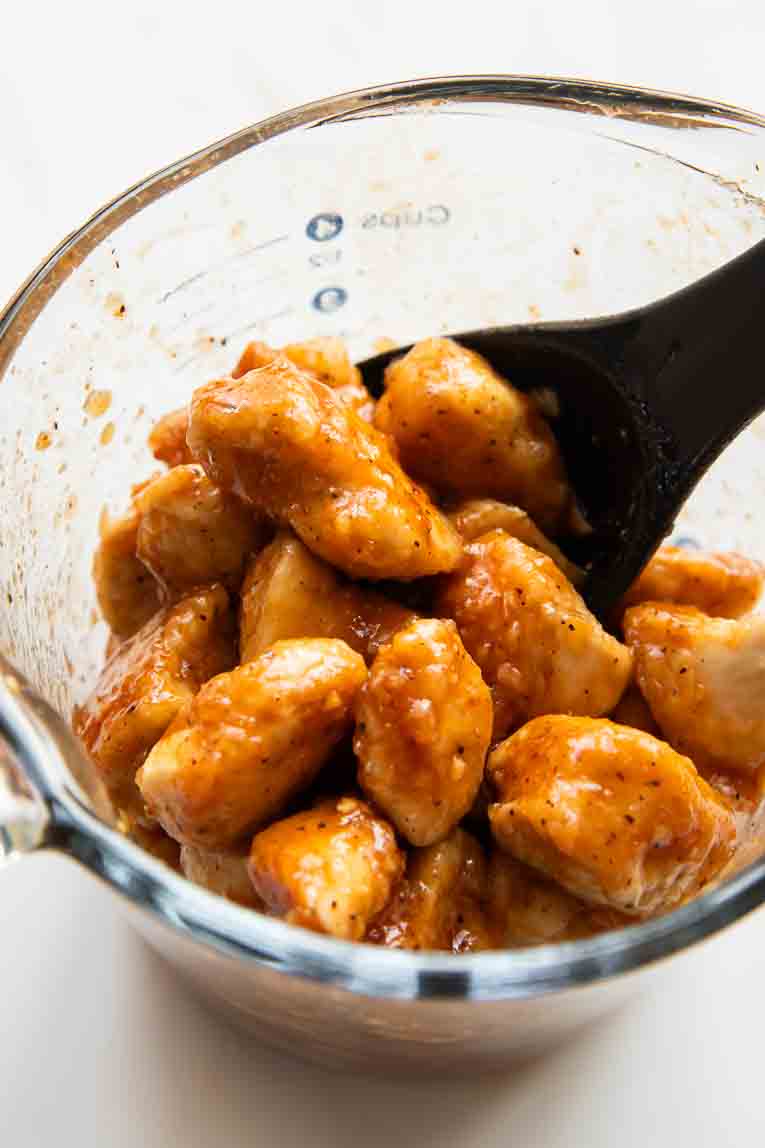
- Add the sauce – Add the chicken to the bowl of sweet and sour sauce, and toss to coat.
- Cook the veggies – Add more oil to the skillet, add the edamame and bell peppers, and season with salt. Cook until the veggies begin to soften, stirring occasionally.
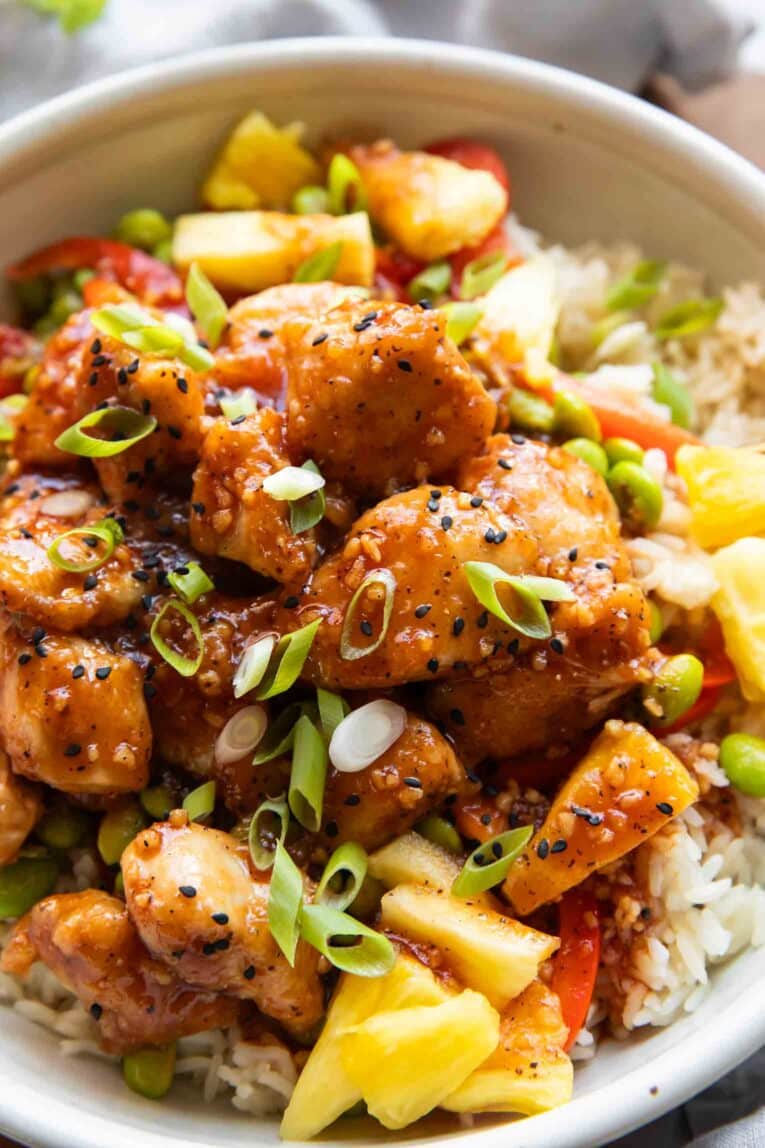
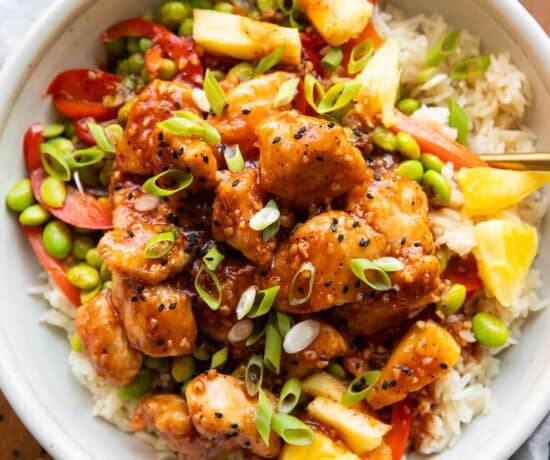
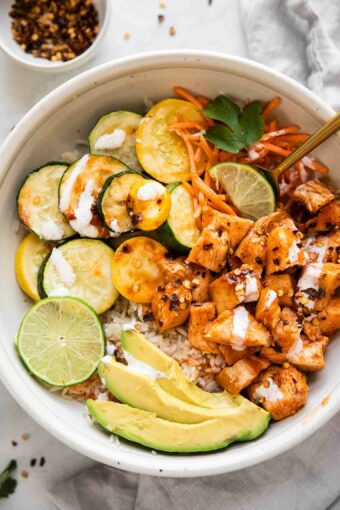
- Serve – Portion rice into bowls, add the veggies and chicken, followed by pineapple chunks, and finish with green onions and extra sauce. Enjoy!

Tips
- Don’t overcrowd the pan. Cook the chicken in a single layer so it gets golden and crispy instead of steaming. Work in batches, if needed!
- Let the chicken cook before flipping. This is one of those trust the process kind of things. Give the chicken pieces time to form a crust before stirring. It’s tempting to constantly stir the chicken, but this helps the coating stay intact and creates that crisp exterior we want.
- Use a True Non-Stick Pan. Since the chicken is lightly fried in the pan AND the veggies are cooked in the same pan, it’s very helpful to use a true non-stick.
- De-Glaze Between Cooking. You don’t have to do this, but if you do get a lot of the chicken breading sticking and even burning on to the pan, it’s helpful to add a splash of rice vinegar and use a spatula to remove the burned pieces before adding in more oil and the veggies.
RELATED: Honey Sesame Chicken Meal Prep Bowls
Variations
- Use a different protein. Swap the chicken for shrimp, pork, or tofu. For shrimp, reduce the cook time to just a few minutes per side.
- Try a plant-based version. Use crispy baked or pan-seared cauliflower or tofu in place of the chicken, and toss it with the sauce just before serving.
- Add more veggies. Broccoli, snap peas, carrots, or zucchini all work well and add extra color, nutrients, and crunch.
- Make it spicy. Add red pepper flakes, sriracha, or chili garlic sauce to the sweet and sour sauce for a little extra heat.
- Change the base. Serve the chicken and veggies over brown rice, cauliflower rice, quinoa, or even rice noodles instead of jasmine rice.
- Turn it into lettuce wraps. Skip the rice, and serve the sweet and sour chicken in butter lettuce cups for a lighter option. It makes for a fun appetizer!
How to Store
Fridge – Once cool, I transfer the mixture to individual airtight containers and store them in the fridge for 4-5 days.
Freezer – Transfer all the components of the sweet and sour chicken bowls to a freezer-safe container, and freeze for up to 3 months.
Reheat – Thaw frozen portions in the fridge overnight. Then, reheat them in the microwave, adding 1-2 teaspoons of water or broth to loosen everything back up. It’s the best recipe for meal prep or leftovers!
More Healthy Chicken Recipes
- Southwest Chicken Burrito Bowl
- Peanut Butter Chicken Recipe
- Spicy Chicken Ramen
- Fajita Chicken Casserole
- Healthy Chicken Tacos with Sriracha
- Pesto Chicken Pasta Bake
High-Protein Bowls You’ll Love
- Hot Honey Chicken Bowls
- Greek Chicken Bowl Recipe
- Honey Glazed Salmon Bowl Recipe
- Copycat KFC Bowls
- Fried Shrimp Bowls
- Crispy Carnitas Bowls
Want to save this recipe? Enter your email below and I’ll send the recipe to your inbox. Plus you’ll get new healthy recipes every week!

Sweet and Sour Chicken Bowls
Video
Equipment
Ingredients
Chicken
- 1/4 cup tapioca starch (or potato starch)
- 1 teaspoon garlic powder
- 1/2 teaspoon salt
- 1/4 teaspoon pepper
- 1 1/2 pounds boneless skinless chicken breasts, cubed (about 3 cups)
- 2 Tablespoons avocado oil
Sauce
- 1-2 Tablespoons pineapple juice
- 3 Tablespoons rice vinegar
- 1/3 cup honey
- 2 Tablespoons tomato paste
- 1 Tablespoon tamari (or soy sauce, coconut aminos)
- 2 1/2 teaspoons minced garlic
- 1/2 teaspoon salt
- 1/2 teaspoon pepper
Veggies
- 1-2 Tablespoons avocado oil
- 2 cups shelled edamame
- 1 cup sliced bell peppers
- 1 cup cubed pineapple
- 1/2 teaspoon salt
Bowls
- 2 cups cooked jasmine rice
- 1 medium green onion stalk (chopped, for garnish)
Instructions
- In a medium bowl combine tapioca starch, garlic powder, salt, and pepper.
- Add in the cubed chicken and toss until well coated.
- In a large non-stick skillet, add the avocado oil, heat over medium-high heat, and add in the chicken.
- Let pan fry for 5-8 minutes before flipping and cooking for another 5-8 minutes (or until the outsides are golden brown and the chicken is fully cooked). Once cooked stir a bit to break up the pieces.
- While the chicken cooks – In a large bowl mix the sauce ingredients, and set aside about 1/4 cup of the sauce.
- Transfer to a paper towel to allow any excess oil to drip off.
- Once the oil has dripped off the chicken add it to the large sauce bowl and toss/mix until fully coated.
- Add more avocado oil to the pan and bring up to medium-high heat.
- Add in the edamame, bell peppers, and salt, cooking for about 7-10 minutes and stirring occasionally, until the veggies start to soften.
- While the veggies cook, divide the rice equally between 4 bowls or meal prep containers.
- Assemble the bowls – evenly divide the veggies and chicken, add pineapple chunks, and top with chopped green onions. Drizzle each bowl with the extra sauce and enjoy!

Vicky says:
This was so delicious. The sauce was great and the chicken was nice and crisp, everything about it was perfec. Thank you for sharing
JOL Team replied:
So glad you enjoyed it!
Laura says:
This was really good. Only issue is that my chicken got slimy with the tapioca starch instead of crispy, it still tasted good, but it was just visually not as appealing. What did I do wrong?
JOL Team replied:
So glad you enjoyed it Laura. The biggest tip I have is to be sure to not overcrowd the pan. A large pan or working in batches makes a big difference when wanting the chicken to get crispy. Hope that helps!
Juanita Wright says:
I wonder if these could be assembled and frozen? Have you tried that?
JOL Team replied:
Yes! You can prep and freeze assembled bowls for a quick reheat meal. I do recommend adding 1-2 teaspoons of water or broth to help loosen everything up. Enjoy!
Ana says:
This recipe was so delicious! I highly recommend it. I substituted farro for the white rice for added nutrition. My husband and son had it with rice. We all loved it!